What makes the difference between a clean board graphic and one with bubbles or crooked edges? For mounting graphics on board, the result often depends on choices made before you peel the backing: matching the application method to the graphic and board, then preparing and aligning both carefully.
A small alignment error can become obvious across a wide panel. Dust, uneven pressure or a rushed application can leave visible bubbles and wrinkles. A planned sequence helps you avoid these problems, especially when working with a large print.
This guide covers how to assess the board and graphic, prepare the surface, plan alignment and apply the print with steady, controlled pressure. You’ll also learn what to check around the edges, where lifting can spoil the finish. If you need a presentation, display or event panel, London City Print provides foam board printing. Preparing your artwork and confirming the dimensions in advance helps you plan a polished board graphic with fewer avoidable defects.
Key Takeaways
- Decide whether to apply a separately printed graphic to a board or print directly onto the board.
- For mounting graphics on board, match the method to the graphic, substrate and equipment you have available.
- Dry-fit the print and use a controlled application sequence to help limit skew, creases and trapped air.
- Set the display purpose, viewing distance, location and board dimensions before preparing artwork for print.
- Consider foam board printing for a presentation, display or event, and prepare print files to the final dimensions.
Mounting Graphics on Board: What the Process Involves
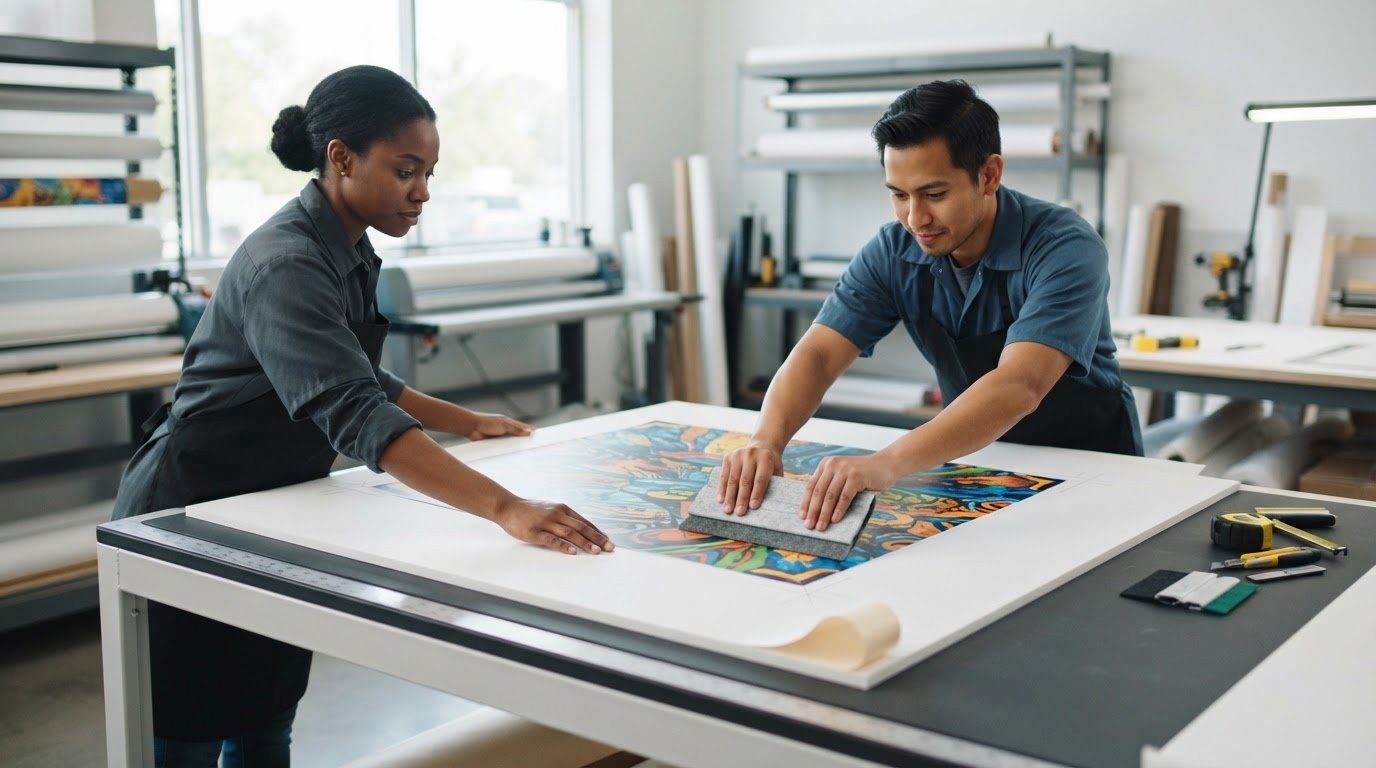
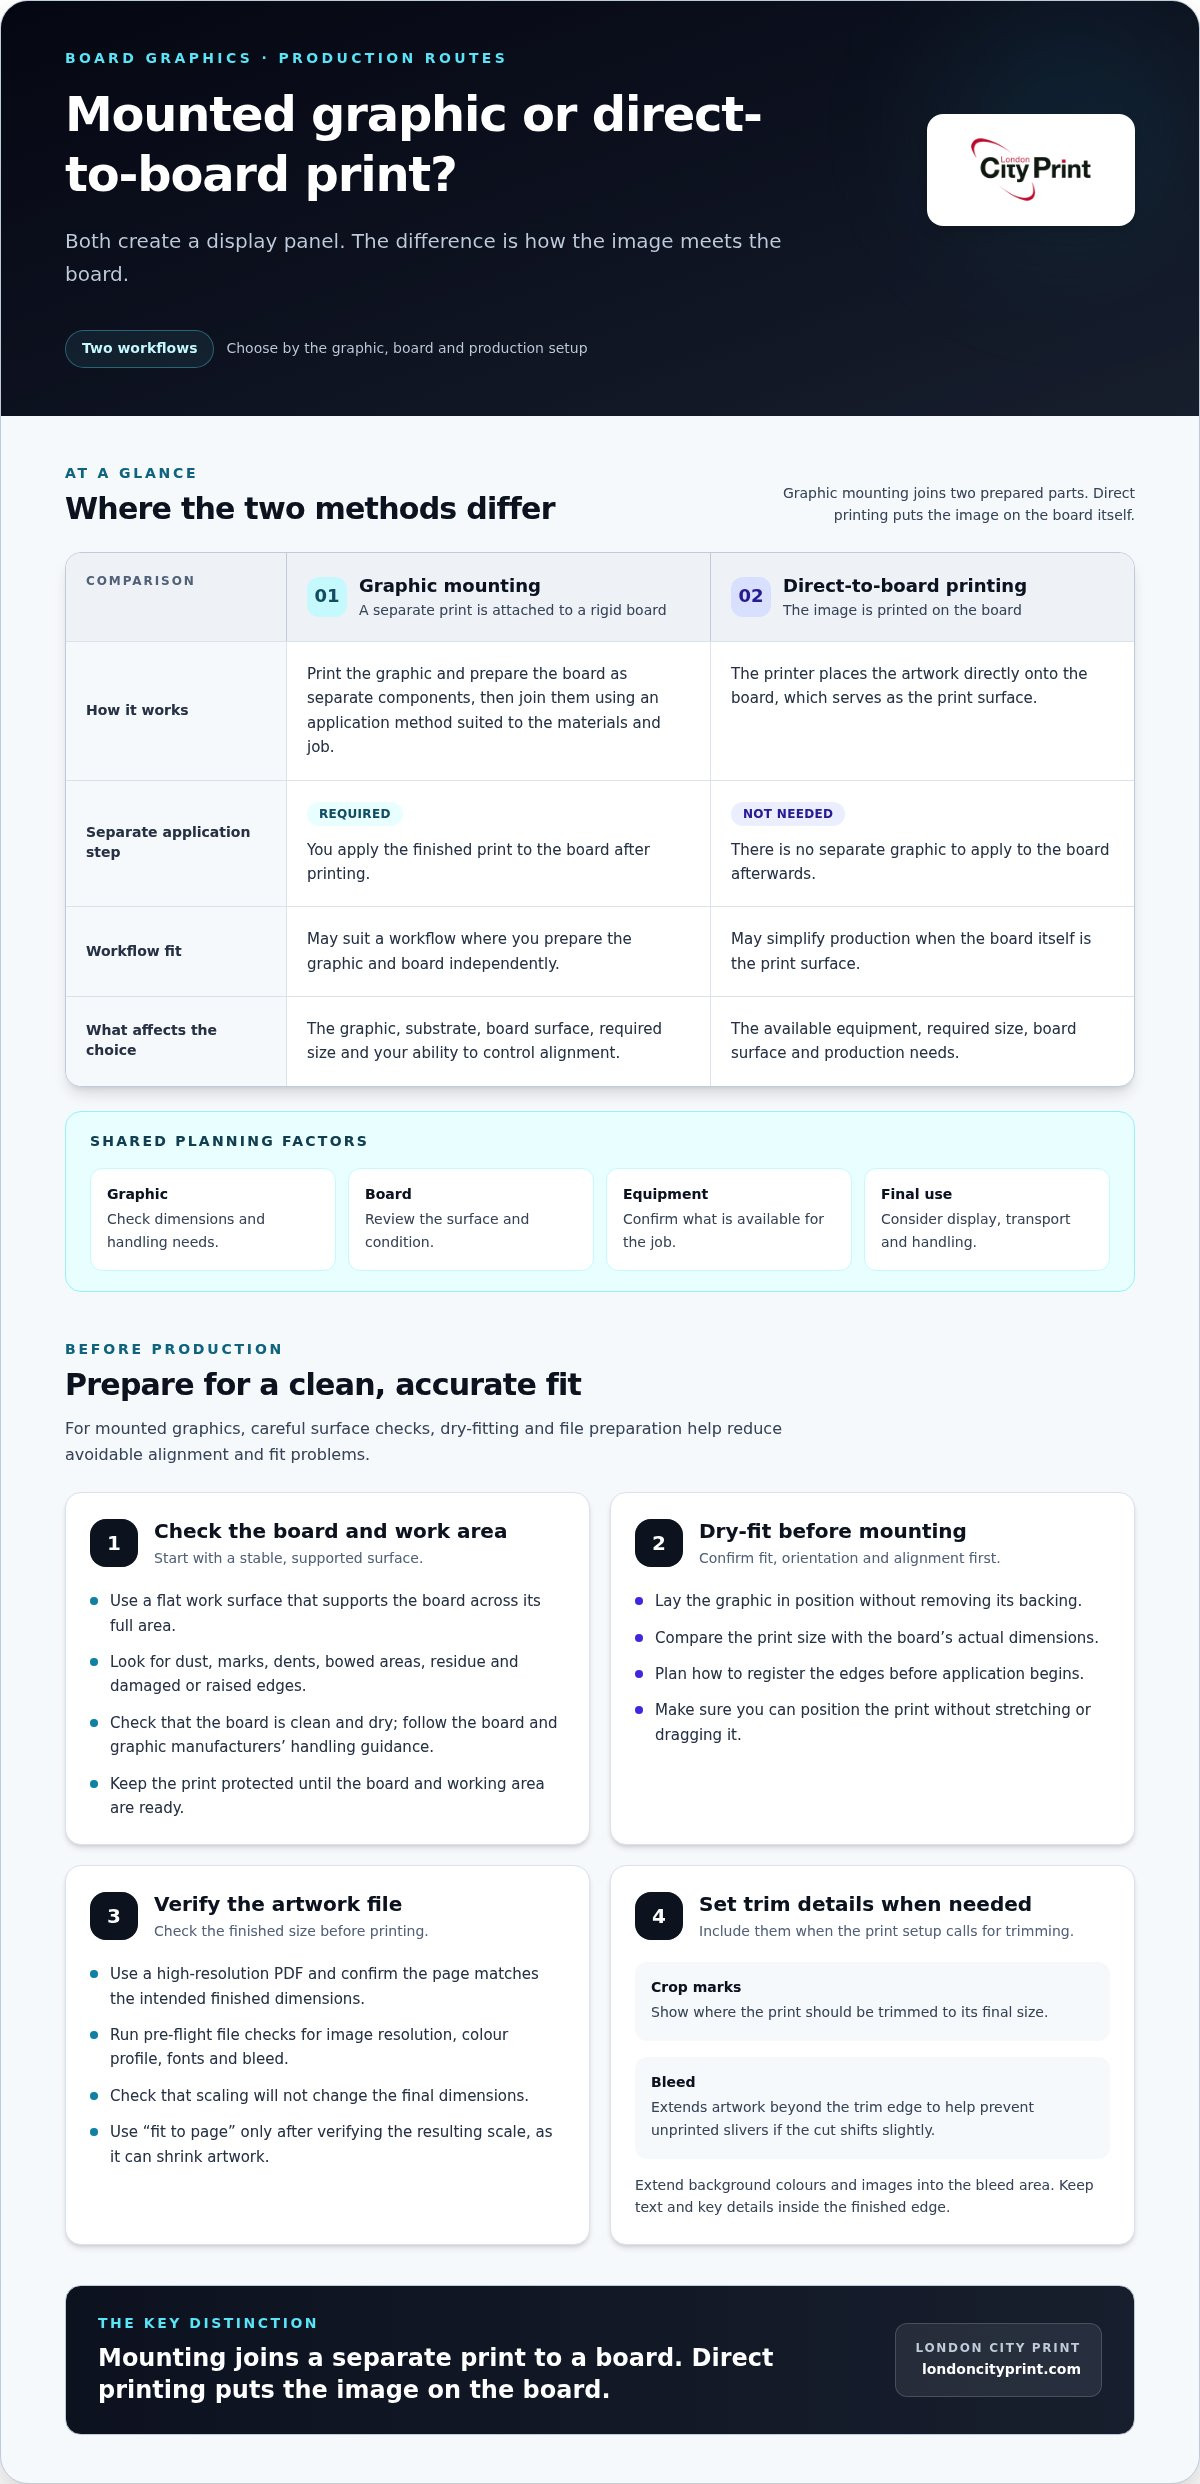
Mounting means attaching a separately printed graphic to a rigid board to create one display panel. You print the graphic and prepare the board as separate components, then join them using an application method suited to the materials and job. This differs from direct-to-board printing, where the printer places the image directly onto the board. The right workflow depends on the graphic, board and production setup.
Mounted graphics can suit presentations, exhibition displays, temporary signs and other settings where you need a flat, self-supporting panel. Consider how you’ll use, transport and handle the finished piece, as well as its dimensions. For a visual history of cut, rearranged and layered images, see these photomontage techniques. Commercial graphic mounting has a different purpose: it attaches a finished print to a board for display.
Mounted graphics and direct-to-board printing
Graphic mounting applies a separately printed image to a rigid board surface. You produce the graphic first, then attach it to the board. Direct-to-board printing combines those stages by printing the artwork on the board, so you don’t need to apply a separate graphic afterwards.
Choose according to the job’s production needs. A separate print may suit a workflow where you prepare the graphic and board independently. Direct printing may simplify the process when the board itself serves as the print surface. The available equipment, required size and board surface all affect which route is practical. For a display panel, London City Print’s foam board printing is an option to consider during project planning.
What affects the finished result?
Assess the graphic and substrate together before choosing an application method. A method that works for one board or print may not suit another, so check product-specific guidance before proceeding. The board’s surface condition, the graphic’s dimensions and your ability to control alignment all affect the application and the finished panel’s appearance.
- Board condition: Check for dust, damage, uneven areas or residue that could prevent a smooth application.
- Graphic dimensions: Larger prints need more careful handling and a clear positioning plan across the board.
- Alignment: Decide how you’ll register the edges before application, so you can place the graphic accurately rather than correcting its position halfway through.
Plan for the final use as well as the materials. A presentation graphic that you handle occasionally may have different practical requirements from a temporary event sign that you transport and display. Confirm the board dimensions and graphic size in advance, then choose an approach based on the surface and equipment available. This assessment gives you a clear workflow and helps prevent avoidable alignment problems.
Prepare the Board and Graphic Before Mounting
Preparation is your chance to catch small problems before they show on the finished panel. Inspect the board, verify the print dimensions and check the artwork file before you start. A quick review can prevent a misplaced edge, a poor fit or a print that needs correction before application.
Check the board surface and working area
Start with a flat, stable work surface that supports the board across its full area. If the board flexes or hangs over an edge, it may shift while you position the graphic. Clear the area so tools, packaging and loose material don’t get trapped beneath the print.
Inspect the board in good light. Look for dust, marks, dents, bowed areas and raised edges. Check that the surface feels dry and has no visible residue. Adhesive won’t necessarily conceal an uneven patch or damage; an imperfection may show through the graphic or affect how the print sits. Follow the board and graphic manufacturers’ handling guidance, and don’t apply a cleaning product unless the guidance supports it.
- Confirm the board looks clean and feels dry, then place it on a level surface that supports it fully.
- Check each edge and corner for damage or irregularities.
- Keep the print protected until the board and work area are ready.
- Lay the graphic in position without removing its backing to check the fit and orientation.
This preparation also helps you plan how to handle the print. A larger graphic can be harder to control, so make sure you have clear access to the board and can position the print without stretching or dragging it. For a practical example of mounting a poster on foam board, review the stages before you begin.
Prepare print files and confirm dimensions
Check the artwork before printing, not after it reaches the workbench. Use a high-resolution PDF and compare its intended finished size with the board’s actual dimensions. Even a small mismatch can leave an unwanted border or make the graphic overhang the board.
Run pre-flight file checks for image resolution, colour profile, fonts and bleed. Confirm that the page matches the intended size and that scaling won’t alter the final dimensions. Avoid “fit to page” unless you’ve verified the resulting scale, since this setting can shrink the artwork.
Crop marks show where to trim a print to its final size. Bleed extends artwork beyond the trim edge, helping prevent unprinted slivers if the cut shifts slightly. Include crop marks and bleed only when the artwork needs trimming and the print setup calls for them. Extend background colours and images into the bleed area, while keeping text and key details inside the finished edge.
Once the file and board measurements agree, record the confirmed dimensions in your job notes. For a presentation or display, foam board printing from London City Print provides a professionally printed panel.
Choose a Mounting Method for the Board and Graphic
The right method for mounting graphics on board depends on the graphic’s dimensions, the number of panels, the board surface and the equipment available. Hand application may suit a controlled, one-off task, while a laminator can support a repeatable production workflow. Direct-to-board printing takes a different route: the printer applies the image to the board, so you skip a separate mounting step when that approach suits the job.
Use this comparison to narrow your options. It describes general workflows rather than guaranteed results. The graphic, substrate and equipment setup all affect what works for your project.
| Method | Suitable context | Equipment needs | Key limitation |
|---|---|---|---|
| Hand application | A small or controlled task where you can manage positioning by hand | A clear, supported work area and tools suited to the chosen graphic | Careful handling and operator technique determine placement and finish |
| Laminator-assisted application | Jobs where the available machine setup can feed the graphic and board | A laminator, adequate board support and a controlled feed path | The machine’s format and feed arrangement may limit the job |
| Direct-to-board printing | A project where the board itself can serve as the print surface | Printing equipment that suits the board’s dimensions and production requirements | You skip separate mounting, but still need to match the board and print setup to the project |
When hand application may suit a job
Consider hand application for a smaller panel or a task where you can control the graphic’s position throughout the process. Dry-fit the print first, establish a reliable reference edge and apply it gradually while keeping the board supported. Manual application won’t suit every material or size. When selecting suitable adhesives or mounting tapes for the job, specialist distributors such as fossewaytapes.co.uk supply industrial tapes and spray adhesives designed to bond prints cleanly to rigid substrates. The graphic, board surface and application technique all affect the result.
When machine application or direct printing may fit
A laminator-assisted workflow needs more than a machine. Support the board and guide the graphic and substrate along a controlled path through the equipment. Arlon’s workflow highlights support and reverse-feed considerations for large substrates. Use these details to assess whether your setup can handle the job without obstructing the feed.
Hand application gives you direct control, laminator-assisted application uses a supported machine feed, and direct-to-board printing removes the separate mounting stage when available. No method suits every job. Match the workflow to the panel dimensions, production quantity and equipment you can use. A small one-off panel may need a different setup from a repeated run. For larger work, plan board handling and feed support carefully.
Before you commit, compare the board and graphic specifications with the equipment requirements. Don’t assume that a particular adhesive, print or board surface will work together without product-specific guidance. If you need a finished printed panel rather than a separate graphic to apply, London City Print provides foam board printing for presentations and displays.
Apply the Graphic and Reduce Common Mounting Defects
Once your board and print are ready, work methodically. Rushing the first placement can leave a large graphic skewed or force you to handle it again. The steps below offer a cautious sequence for mounting graphics on board. Follow the instructions for your specific graphic, board and adhesive, since application and correction techniques vary.
A controlled application sequence
Dry-fitting lets you check the position and edges before you commit the graphic. Correct any alignment issues while the print is still easy to move.
- Set the board in position. Support it on a stable surface and orient it as it will sit in the finished display.
- Dry-fit the graphic. Place it over the board without exposing the adhesive. Check that the edges align with your intended margins and that the artwork faces the right way.
- Choose a reference edge. Use the board edge or another clear visual guide to establish the starting position. For a large graphic, arrange for a second person to help hold and guide it if needed.
- Begin gradually. Expose or apply only the part allowed by the product instructions, then bring the graphic into contact in a controlled direction. Keep checking alignment as you proceed.
- Continue across the panel. Work steadily from the positioned area, smoothing the graphic as directed by the adhesive or application guidance. Don’t pull or stretch the print to force it into place.
- Inspect the result. Check the full surface, corners and edges before moving or displaying the board.
Keep your hands and tools clear of areas that haven’t yet been applied. A stable board and consistent direction of progress make it easier to maintain position and avoid trapping folds beneath the print.
Spot and address visible defects
Inspect under even light, looking across the graphic as well as straight down. Compare the print edges with the board edges to check for skew. Look across the surface for creases, bubbles or raised areas, then examine the perimeter for edges that haven’t adhered evenly.
- Misalignment: Reduce the risk by confirming the position before application and checking the reference edge as you work. If the graphic shifts, stop rather than pulling it sharply back into place.
- Bubbles or wrinkles: Limit them by applying the graphic gradually and keeping unplaced areas under control. Don’t puncture, lift or press a defect without checking the adhesive instructions first.
- Lifting edges: Inspect corners and borders closely. Follow the product guidance for an edge that hasn’t held; reworking it may not suit every material.
Some defects can’t be corrected without damaging or replacing the graphic. If you need a professionally printed panel for a display or presentation, explore foam board printing options from London City Print.
Plan a Professional Printed Board for Your Project
A clear project brief helps you plan the board around its actual use instead of choosing dimensions or artwork in isolation. Consider where people will see it, how far away they’ll stand and whether the panel is for a presentation, display or event. Location matters too: a board intended for an indoor presentation may have different practical requirements from one you’ll transport between event spaces.
Prepare a clear print brief
Record the essential details before preparing artwork or arranging production. This gives everyone working on the project a consistent reference and helps surface missing information early.
- Intended use: State whether the board is for a presentation, exhibition, event or another display purpose.
- Viewing distance: Describe how close the audience is likely to stand. This helps guide text size and image detail.
- Location and handling: Note where you’ll display the board and whether you’ll move it between locations.
- Finished dimensions: Specify the required width and height, then make sure the artwork follows those dimensions.
- Quantity: Confirm how many boards you need. Production quantity can influence the practical print workflow, so include it in the brief from the outset.
- Artwork status: State whether the file is final or still in progress, and identify who will prepare or approve it.
Supply high-resolution PDFs where possible. Before production, run pre-flight file checks for resolution, colour profile, fonts and bleed. Confirm that the document size matches the required finished dimensions, and make sure any crop marks or bleed suit the artwork and print setup. Identify the approved file version clearly to reduce the risk of using an outdated design.
Artwork readiness affects planning. A final, correctly sized file gives you a clearer starting point for production, while unfinished artwork may still need design decisions or corrections. Quantity matters too: digital printing is most efficient for short runs under 500 units. Include your intended quantity and file status in the brief, and plan production around the confirmed job details.
Move from mounting plan to printed board
For display and presentation work, London City Print provides foam board printing and large-format printing up to A0 size and beyond. A professionally printed board can be a practical choice for a presentation, exhibition or event. If you’re comparing formats, the large-format poster printing guide can help you consider poster planning alongside a board-based display.
Once you’ve defined the purpose, dimensions, quantity and artwork status, you have a useful brief for production. If you’re planning a printed board, discuss your project with London City Print.
Turn Your Board Plan into a Print-Ready Project
Decide what viewers should notice first. A clear visual priority helps you shape the artwork, choose a suitable viewing distance and keep the panel focused on its purpose. Before production, make sure the design, dimensions and quantity reflect how you’ll use the board, not just how it looks on screen.
Good planning gives your print brief a practical starting point. If you’re preparing an event display, presentation panel or another printed board, outline its intended use and share the approved artwork. London City Print has operated since 2009 and can help you plan the printed element of your project.
Discuss your printed board project with London City Print to move your mounting graphics on board plans forward. A clear brief helps you progress with confidence and create a display that communicates the right message.
Frequently Asked Questions
What does mounting a graphic on board mean?
Mounting a graphic on board means attaching a separately printed image to a rigid board to create a display panel. You produce the print first, then fix it to the board. This differs from printing the image directly onto the board. When mounting graphics on board, consider whether the separate print-and-board workflow suits your project, including its dimensions, intended use and materials.
Can you mount a graphic on foam board?
Yes, you can apply a separate graphic to foam board if the graphic, board surface and adhesive system are suitable for one another. Check the product guidance rather than assuming a particular combination will work. For example, a presentation panel may use foam board as its base, while the surface finish and planned handling help determine the right application approach.
Is it better to mount a graphic or print directly onto the board?
Neither option is always better. Mounting uses a separately printed graphic and a board, while direct-to-board printing places the image on the board itself. Choose based on your required workflow, artwork, board dimensions and available production equipment. If you need the graphic and support as separate components, mounting may fit. If the board can be the print surface, direct printing may suit the production plan.
How do you stop bubbles when mounting a graphic on board?
Reduce the chance of bubbles by supporting the board and guiding the graphic into place gradually, without letting loose areas fold onto the surface. Work in a clean area and follow the graphic or adhesive instructions. If a bubble appears, don’t puncture it or lift the print automatically. Check the product guidance first, since correction methods vary and can damage the graphic or board.
Can a mounted graphic be removed from a board?
Sometimes, but removal depends on the adhesive, graphic and board surface. The print may tear, leave residue or damage the board when you lift it, so don’t assume you can reuse the panel. If you may need to change the display later, plan for that before mounting and choose materials with guidance suited to the intended use. Test a discreet area only if the product instructions permit it.
What file format should I use for a board graphic?
A high-resolution PDF is a practical choice for a print-ready board graphic because it can preserve layout, fonts and image quality. Before sending the file, confirm that its page size matches the intended finished dimensions and that fonts display correctly. Include crop marks or bleed only if the artwork needs trimming and the print setup requires them. Review the exported PDF at full size for missing elements.
Does a mounted board graphic need lamination?
No, lamination isn’t automatically required. Decide based on the display’s purpose, expected handling and the finish you want, then check that any chosen laminate suits the graphic and board. A coating can change printed colours and reflections, so consider how the panel will look under its planned lighting. Follow product specifications rather than adding lamination by default.